Contents
If you think your first domain name was a mistake, there may come a time when you think the best way to rebrand your website is to change the domain name. Changing your domain name could go wrong if not done the right way. As a matter of fact, you could lose your traffic, link juice, and everything. This is why you need to be cautious when changing your domain name.

To safely rebrand and change your WordPress domain name without losing your existing traffic, there are 3 basic steps to follow:
- Creating an add-on domain with the new domain name.
- Changing the domain name from WP dashboard.
- Setting up a 301 redirect to retain traffic and link juice.
Creating an add-on domain
To change your WordPress domain name safely, you need to create an add-on domain. If you’re new to this, add-on domains let you create new sites right on the same cPanel account. If your hosting account doesn’t allow this and only lets you have just one website hosted, you need to contact your hosting provider to upgrade your hosting account to allow the creation of add-on domains.
Setting up an add-on domain for the purpose of changing your WordPress domain name can be a bit tricky. When setting up the add-on domain for the new domain name, you have to make sure it points to your existing WordPress installation folder.

If your existing WordPress is located inside public_html, you need to leave it as shown in the image above. However, if it’s inside a subfolder, you need to enter the path like this: public_html/olddomain.
If you’re not sure where your existing WP installation is located, you need to head to your File Manager to figure it out. This part is very important.
To verify that you did it correctly, type the new domain name in your browser. If it displays your existing WordPress site, you should move on to the next step. If it doesn’t review this first step and do it correctly.
Changing your domain name from WordPress dashboard
This part is relatively easy. Go to your WordPress Dashboard > Settings > General. In the space provided for WordPress Address and Site Address, enter your new domain name.

Save your changes. You should be redirected to the login page after this. Now you can log back in and move on to the last step.
Setting up a 301 redirect to retain traffic and link juice
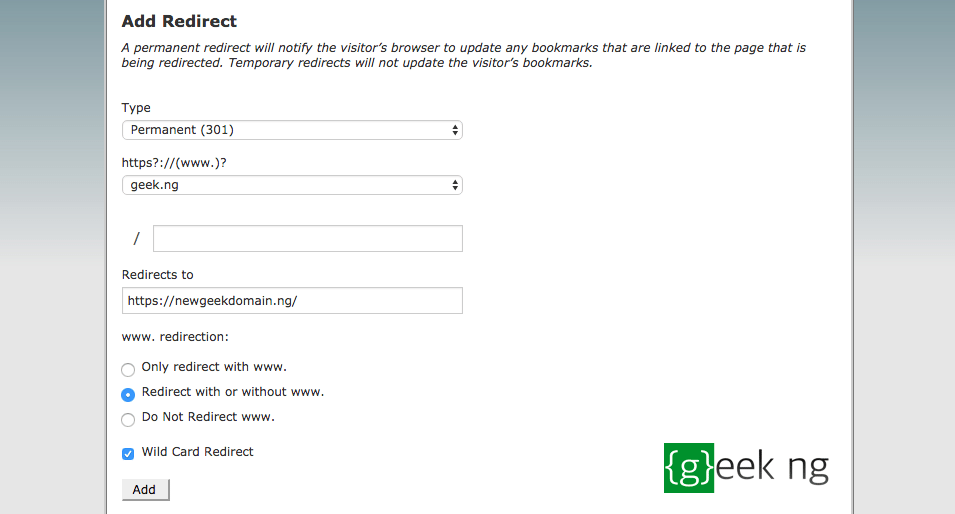
This is the very last step. Go to the cPanel File Manager or log in to your WordPress directory through FTP. The easiest way to do this is by going to cPanel > Redirects (under Domains). Set up your redirect as shown and you should be good to go.

If you don’t have cPanel, open the .htaccess file in your WP installation folder (or create a new one if it doesn’t exist) and put this piece of code:
RewriteCond %{HTTP_HOST} ^olddomain.com [NC,OR]
RewriteCond %{HTTP_HOST} ^www.olddomain.com [NC]
RewriteRule ^(.*)$ http://newdomain.com/$1 [L,R=301,NC]
Just remember to change oldomain.com, www.oldomain.com, and newdomain.com in the code above to your old domain name and new domain name as appropriate.
Wrapping it up
Be sure to login to Google Webmaster Tools and notify Google of the change in address. First, you need to add the new website and get it verified. Next, go to the old site from within Webmaster Tools. You can do this by selecting your website from the drop-down list. Hit the gear button on the top-right and select Change of address.

On the next page, select the new domain name from the list and set up the change of address accordingly.
With these steps followed closely, you should successfully change your WordPress site domain name and redirect safely without losing your traffic or SEO.