Dropbox has now released the 1.4 version for Windows and Mac application with a featured known as Camera Upload enabled in it. You must be remembering that during the camera upload feature beta testing, you used to get an opportunity to receive a free Dropbox storage up to 3.5 GB simply to upload different pictures and videos. The additional storage for free could be availed with its official release wherein you get 500 MB during your first upload and the storage space of around 3GB. In case, if you are not interested in keeping the pictured in Dropbox but still want to have the free space, you simply are required to upload your 3GB videos and photos and simply delete them all. In this way, you can keep your space intact with you. The following are the ways to set up the new Dropbox camera upload feature on Mac.
Getting started
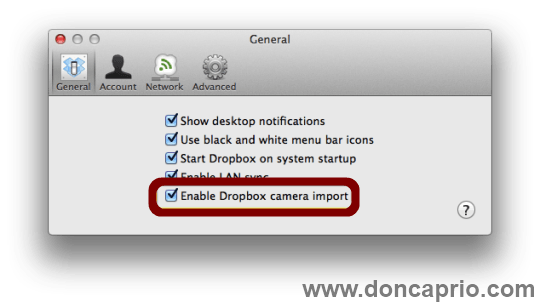
In order to start, you need to download the 1.4 version of Dropbox meant for Mac and install over your device. Once you install it, you would be promoted with a message to enable upload, if you are not interested in doing so simply click over the Dropbox icon seen over the menu bar and selecting the option of Preferences. Now, under the General Tab, you would see a check box where you can enable the option, ‘Dropbox camera import’. Simply check this box followed by closing the preferences panel.
The next step
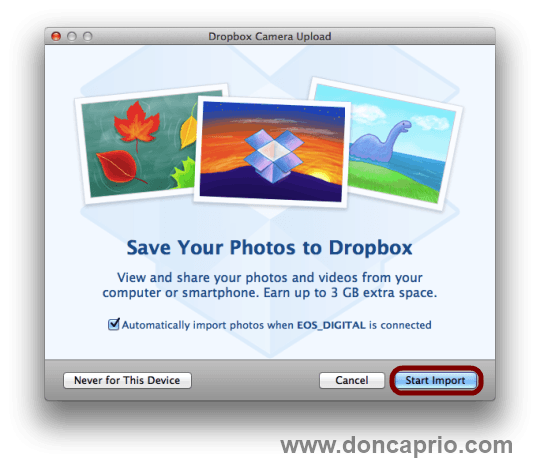
The next time when you plug in your device which stores videos or pictures, you would see a screen which says – ‘Save Your Photos to Dropbox’. This is the place where you get the opportunity to set the Dropbox in a way which you want any particular plugged in device to interact. If you leave the box checked for the option of automatic import, it would help you in enabling the Dropbox to import all your pictures and videos without plugging your Mac.
You also have the option of not allowing the Dropbox to upload your media files from any of your specific device by simply clicking over the option – Never for this device’. If you are keen to be prompted every time when you connect over your device, simply uncheck the box of auto import and then click over the ‘Start import’ option. The videos and photos which were not previously imported via Dropbox will be then sent to your Dropbox account. The moment the import process is finished, you would find a new Finder window opening up and showing all the files.
Some caveats
There are several warnings attached to this new feature like you are not supposed to pick and select the pictures which you are interested in importing, hence it can be termed as all or nothing approach. Further, you do not get any option of managing several devices which you have installed. Hence in case you change your mind and do not wish to continue importing files automatically from any particular device, then you have only one option to do so. This can be done by disabling the complete feature shown in the Preferences followed by enabling it again. Lastly, if you have earned 3.5 GB of free storage space by being the part of beta, you are not eligible to claim for the further storage space.
Wrapping up
Dropbox is among the most popular synching tools and a very useful tool, considering all these important features, as per Steve Jobs, Apple always wanted to buy this application at 800 million dollars, however, the company didn’t sell the tool to Apple. Following the above tips discussed in the article you can set up the new Dropbox camera upload feature on Mac.

