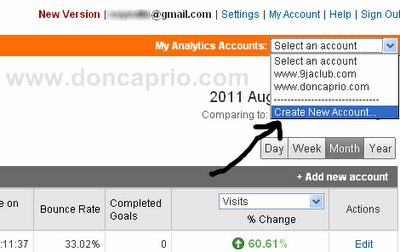
Just to increase pageviews, a blog must be designed in such a way to keep visitors busy, letting them explore parts of your site that might remain undiscovered without a design based on easy navigation. Just like the related post widget and numbered page navigation, adding breadcrumb navigation ( also called link tree) is just another way to keep your visitors engaged and stay longer on your blog. In case you don’t know what link tree means, it’s those links that shows where you are in a site and in blogger, it trails from the homepage down to label page and lastly, the post page you’re presently viewing. You can see it right at the top of this blog post and if you can’t, below is the screenshot of just how it should look.

To add this to your blog, follow these simpple steps:
1. Log in to your blogger account and click on Design ( hey, I’m still using the old interface )
2. Click on Edit HTML and check Expand Widget Template box
3. Press CTRL and F on your keyboard and search for this code:
4. Right below that, paste this:
There may be two occurrences of <b:include data='top' name='status-message'> in your template, you should do the same thing if there’s a second one.
5. Now search for this code:
6. Just above it, paste this code:
<b:if cond='data:blog.homepageUrl == data:blog.url'>
<!– No breadcrumb on home page –>
<b:else/>
<b:if cond='data:blog.pageType == "item"'>
<!– breadcrumb for the post page –>
<p class='breadcrumbs'>
<span class='post-labels'>
<a expr:href='data:blog.homepageUrl' rel='tag'>Home</a>
<b:loop values='data:posts' var='post'>
<b:if cond='data:post.labels'>
<b:loop values='data:post.labels' var='label'>
<b:if cond='data:label.isLast == "true"'> »
<a expr:href='data:label.url' rel='tag'><data:label.name/></a>
</b:if>
</b:loop>
<b:else/>
»Unlabelled
</b:if>
» <span><data:post.title/></span>
</b:loop>
</span>
</p>
<b:else/>
<b:if cond='data:blog.pageType == "archive"'>
<!– breadcrumb for the label archive page and search pages.. –>
<p class='breadcrumbs'>
<span class='post-labels'>
<a expr:href='data:blog.homepageUrl'>Home</a> » Archives for <data:blog.pageName/>
</span>
</p>
<b:else/>
<b:if cond='data:blog.pageType == "index"'>
<p class='breadcrumbs'>
<span class='post-labels'>
<b:if cond='data:blog.pageName == ""'>
<a expr:href='data:blog.homepageUrl'>Home</a> » All posts
<b:else/>
<a expr:href='data:blog.homepageUrl'>Home</a> » Posts filed under <data:blog.pageName/>
</b:if>
</span>
</p>
</b:if>
</b:if>
</b:if>
</b:if>
</b:includable>
7. Now here comes the last part where you have to apply some skinning to the link tree. You can use the default one below or change it if you know a bit of css.
Search for this code:
In the line immediately above it, paste this:
padding:5px 5px 5px 0px;
margin: 0px 0px 15px 0px;
font-size:90%;
line-height: 1.4em;
border-bottom:3px double #e6e4e3;
font-weight:bold;
}
Now save your template, view a blog post and you should see the breadcrumb navigation links right above your blog posts.
Further Explanation
On step 6, you need to do some editing if you’re using numbered page navigation. It’s not important though but I guess you might not want to see that label page get rather too long with up to 20 posts showing up. I repeat, this is only useful if you’ve done the numbered page navigation tweak.
Simply change 'data:label.url' to 'data:label.url + "?&max-results=5"'
You should change 5 to the number of posts you set to display on a page.


