There are different plugins to easily add paypal donations to your blog if you’re on WordPress but the case is different with Blogger. I had this problem while I was on Blogger platform because every tutorial I read on adding paypal donations to my blog never worked. I read that I needed to generate the code from my paypal account by going Merchant Services. The truth is I never found any option to create a donation button under merchant services. I’m not sure if it was a perculiar problem with my paypal account or it’s perculiar to my selected country of residence during paypal registration.
However, I devised an alternative way to add paypal donations to your blog. This is for for those who can’t find the option to create a donation button directly from their paypal accounts. I took some time to know how this WordPress plugin works and finally used it successfully on a blogspot site. If you’re thinking whether you actually need a donation button on your site, it’s not necessary if you think it’s not but you may be underestimating the generosity of a happy reader. Don’t expect to get thousands of dollars from the button, maybe just a couple of bucks to grab a cup of coffee, who knows? 😛
![]()
First, you must log in to your paypal account and upgrade your account from personal to business if you haven’t. Only business accounts are allowed to receive donations and upgrading costs you nothing.
Adding this button to your blog isn’t that hard and doesn’t require much coding.
Adding the Paypal Donation Button to Blog’s Sidebar
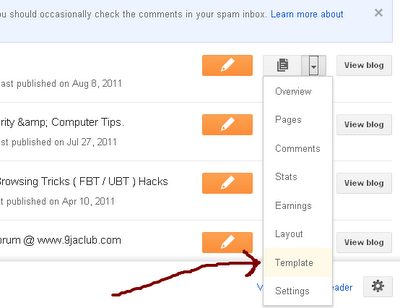
1. If you’re using the old blogger interface interface, go to Design but you only need to go to Layout if you’ve updated to the new interface.
2. Depending on where you want the widget to appear, select Add a Widget
3. Choose HTML/JavaScript and paste this code inside the content area:
<div align="center"><form method="post" action="https://www.paypal.com/cgi-bin/webscr"><div class="paypal-donations"><input type="hidden" value="_donations" name="cmd"/><input type="hidden" value="you@paypal.com.com" name="business"/><input type="hidden" value="https://www.doncaprio.com/thank-you.html" name="return"/><input type="hidden" value="You found the information helpful and want to say thanks? Your donation is enough to inspire us to do more. Thanks a bunch!" name="item_name"/><input type="hidden" value="USD" name="currency_code"/><input type="image" alt="PayPal – The safer, easier way to pay online." name="submit" src="https://www.paypal.com/en_US/i/btn/btn_donateCC_LG.gif"/><img width="1" height="1" src="https://www.paypal.com/en_US/i/scr/pixel.gif" alt=""/></div></form></div>
<!– End PayPal Donations –>
4. Now save your template and view your blog, the donation button should be right there.
Adding the Paypal Donation Button Below Each Blog Post
1. If you’re using the old interface, go to Design > Edit HTML but you should go to Template > Edit HTML using the new blogger version.
2. Check the box labelled Expand Template Widget
3. Search for <data:post.body/>
4. Right below this, past that same code in the first method
5. Save your template
Note: You can change a couple of things in the code to customize it.
1. you@paypal.com – Change this to your own paypal email address. To avaoid bots picking up your email address, you can use your merchant ID instead here. To get your merchant ID, you can follow this link – https://www.paypal.com/webapps/customerprofile/summary.view.
2. https://www.doncaprio.com/thank-you.html – Change this to your return page. You can create a “Thank You” page a donator will be redirected to after making the donation or use your blog’s homepage.
3. You found the information helpful and want to say thanks? Your donation is enough to inspire us to do more. Thanks a bunch! – You can change this to your custom text that will be displayed on the donation page.
4. https://www.paypal.com/en_US/i/btn/btn_donateCC_LG.gif – This is optional but you can change the URL to your own custom donation image.


